Anyone who has exercised on a summer’s day knows that it can be harder to breathe when it’s hot and humid outside and these conditions seem to be especially hard on people with asthma. Asthma is a chronic condition that cannot be cured but medicines. Lifestyle changes can help to control the symptoms which include challenges with breathing, chest tightness and/or coughing or wheezing.Yoga offers a number of practices that can stretch the muscles in the torso helping to open airways and exercise the lungs. For instance, any time you lift your arms over head the rib cage expands, now synchronise this movement with an inhalation and the lungs get to expand as well. Moving with the breath is an important way to get the benefits. Pranayama, or breathing practices, cultivate the ability to manage and control the breath and though it might not cure asthma, scientific research suggests that yoga may at least improve asthma symptoms and this is certainly what a number of my clients have experienced.Whilst doing these practices it’s very important to breathe through your nose even though asthmatics tend to be mouth breathers. Air breathed through the nose is filtered, warmed and moist making it just right for sensitive airways. Nose breathing also promotes efficient movement of the diaphragm.
Join me in this short practice to help open the lungs, move the rib cage and all the muscles around the ribs. If you become uncomfortable at any time please stop your practice and take a rest.
Consult your doctor before starting a new form of exercise.
Exercise can’t always totally cure the effects of poor circulation or divert you from the temptation of staying on the couch under a blanket when it’s cold outside! But as I tell my senior yoga students every week – keep moving and stay well. Extended periods of sitting can lead to joint deterioration and shortening of the muscles not to mention a decline in balance, something we’d all like to avoid.
So, here are some simple practices that can be done from sitting or standing, taken from hatha yoga. They systematically bring warmth and energy into the whole body. These are low-impact and easy on joints, collectively helping to give your circulation and respiration a boost.
Hands
1. Starting with the hands, move slowly through the body maintaining an awareness of the warmth starting to build up.
2. Lift your hands up in front of you and then let them become limp at the wrist. Begin to shake one hand as if shaking water off your hands. Then try the other hand in the same way. Then both hands together.
Arms
1. Relax both arms down by your side. Begin to swing them loosely, first from the elbow and then from the upper-arm. Shake one arm, then the other, now both arms together.
Feet
1. Lift your right foot off the floor, place both hands under your right knee to support your leg. Relax the foot. Now begin to shake your foot from the ankle. This might take some practice as the muscles in the foot are generally in a contracted condition.
2. Repeat on the other foot.
Knees
1. Again, start by lifting your right foot off the floor and place both hands underneath the knee. Relax the lower leg. Begin to swing the lower leg backwards and forwards, (if your knee joint starts to feel uncomfortable stop the movement).
2. Now begin to shake the lower leg from the knee down. Repeat on the other leg.
Hips
1. If it’s comfortable, stand up and place your chair on your left side so that you can hold on to it. Relax the right leg. Now pick up your right foot and start to swing your right leg backwards and forwards. The give the whole leg a really good shake. If this feels tricky you could place a book under your left foot to give you a bit of space. First one leg, then swoop sides and do the other leg.
The whole body
1. You can do this from standing or from seated. Relax the whole body. Starting again from the hands, start to shake the hands, add the arms, then feet, knees etc; until you are doing the hokey-pokey and “shaking it all about”.
2. Sing, bring smile to your face and feel the wonderful vitality in your body!
Have you found that yoga has helped you improve your physical health? Let us know in the comments below.
Yoga can help to ease arthritis by gently increasing range of motion and movement through exercising all the joints. Yoga not only safe for the muscles and ligaments is also stimulates the production of feel-good hormones that can help to reduce pain. One of the great benefits of reducing stress and pain is better sleep. If you are based in Brisbane, you might start with Aqua Yoga classes (taught in a swimming pool) where weightlessness is beneficial for arthritic joints – sounds great but skip the forward bends!
If you have arthritis consider these guidelines before starting:
Delay your practice until later in the day – with some types of arthritis joints tend to be stiffer in the morning so give your muscles and joints time to loosen and wait until later in the day. Only you can tell when yoga will feel the best for you so listen to your body and practice yoga at the most comfortable time for you.
Go easy – give those big full-on movements a miss as they might aggravate the joints.
Keep Moving – a gentle flowing style of yoga class where postures are not held for longer periods of time is really best. Holding postures for those people with arthritis maybe painful. You may decide to gentle move in and out of a posture as an alternative. You need to be taught by a yoga teacher that understands your limitations.
Check with your doctor about flare-ups – when your joints are hurting you maybe able to do some yoga but only for a shorter length of time.
If you are interested in starting yoga please talk to your doctor before starting and when you get to class tell the teacher about your condition so that they can discuss modfication’s to the postures to help you stay comfortable. Remember you can always practice meditation and pranayama (breathing techniques) instead and gain the mind/ body benefits.
Although the hip joint is confined to a finite range of motion it is capable of being resilient, responsive, and stable.
Looking after your hips joints with the same gym routine or exercises over time can become ineffective and a bit like Chinese water torture for your joints and soft tissues. Your nervous system and muscles will quickly learn the routine and will not continue to develop and respond. If you have ever been stuck and can’t seem to make any more progress with strength, endurance, or weight loss, you could think about mixing up your routine or starting something new like yoga.
What’s causing tight hips? It’s actually the muscles and fascia attached to your joints that restrict your movement. How do these muscles become tight? Very simply your body adapts to what you do most frequently and the one body position we all do with great frequency is sit.In a nutshell, our over-use of the sitting posture shortens the muscles, turns off the powerful glutes (buttock muscles) and basically throws our hips and pelvis out of balance. The result is tight hips and lower back pain.
The yoga posture Legs Up the Wall has many great benefits for the body. While reversing the effects of gravity on legs and feet this posture enables stagnant fluids to move, fluids that may build up if you have low blood pressure or edema. Standing or sitting for long periods requires the circulation to work hard pumping blood from the legs back to the heart. Practising Legs Up the Wall allows gravity to assist with both the circulation of blood andthe drainage of lymphatic fluid in the legs and feet. If you’re wondering where these fluids go as they drain, the lymph system is the bodies ‘rubbish collection’ system – it picks up toxins and stagnant fluids such as those that collect with edema and carries them away for elimination.
Resting in Legs Up the Wall is also good for relieving tried leg muscles and draining away tension. Use gravity to your advantage by allowing your body to fully relax in the posture for 10 to 15 minutes or you may like to start with a just few minutes. Although Legs Up the Wall is safe for most individuals, including those who have osteoporosis, it’s not suitable if you have glaucoma or for those taking medication for high blood pressure. Also if youhave serious neck or spine issues talk to your doctor first.
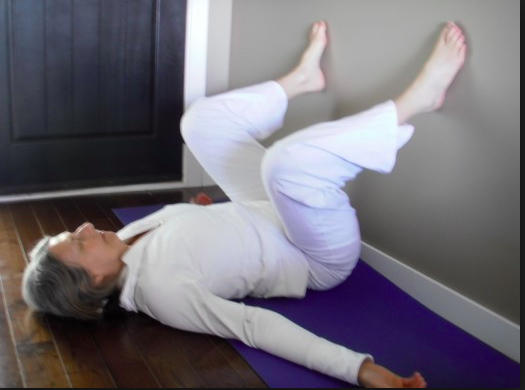
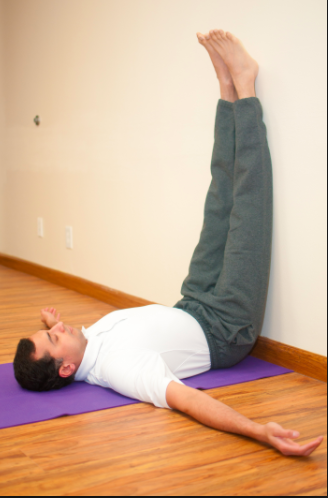
Three ways to get into Legs Up the Wall posture:-
The first way is very simple – lay down on the bed with your head towards the foot of the bed, wiggle yourself as close as you can towards the bedhead. Lift your legs up on to the wall, try to get as close as you can to the wall.
If you are able to get down on the floor – place a blanket (or a yoga mat) and a pillow on the floor beside a wall, make sure there is plenty of space around you. Sit down on the floor with your right hip touching the wall. In one movement, lift your legs up on to the wall as you lye down on your back making a sort of 90 degree angle with you body.
Alternative using a chair – lye down on the floor on your back, lift up your legs and place the calf muscles up on to the base of a chair or the couch.
To come out of the posture draw your knees towards your chest, roll over on to one side and pause there for a minute or two checking on your blood pressure – is there any pounding between your ears? If so, stay here for a few more minutes. When you feel ready gently sit up, take a few deep breaths here before carefully coming up to standing.
There’s a famous quote from Japanese philosophy– change is life. Coping with change is difficult, no matter how old you are. The sheer number of changes and transitions that start to occur as we age can make life seem pretty challenging including the loss of parents, children moving away, declining health and loss of independence. But if these changes are balanced with some positive ingredients we have a successful formula for staying healthy as we age.
Yoga philosophy teaches us that our quality of life can be enhanced by the quality of our perceptions. One of the most powerful positive ingredients we can bring into our daily lives that can change our perceptions is appreciation.For instance, scientific studies have shown that the more couples express appreciation for one another, the more affection they have for one another. The smallest gestures of appreciation counted – a smile, a pat or a simple ‘thank you’. Too often we slip into a negative habit of focusing our attention on what we don’t like or what we want the other person to do differently. Change these negative perceptions with appreciation by noticing what’s going well, notice the many small kindnesses in life– it will works wonders on all those around you. Guess what – you will also receive a return of compliments.
Appreciation paves the way towards greater feelings of contentment, fostering a protective psychological state of mind known as inner peace.
On this path effort never goes to waste, and there is no failure. Even a little effort toward spiritual awareness will protect you from the greatest fear. (Bhagavad Gita)
Seasonal changes bring challenges to the immune system, the thought of winter ailments often sees us reaching for an extra dose of vitamin C. If you’re living in a place that becomes cold and dark in the winter months you might like to add a few simple yoga practices to your daily routine to boost immunity.
The immune system is made up of many components including the tonsils, thymus gland, digestive tract, lymphatic and circulatory systems. Each of these systems plays an important role in helping your body to fight off invaders like bacteria and viruses. The immune system changes with age, it becomes slower to respond so if you’re thinking that ‘an ounce of prevention is worth a pound of cure’ read on:
DO THE TWIST –
All of your internal organs have their nerve endings in your spine and nerves control the body’s functions, including sensation and movement. Moving the spine with gentle twisting is extremely beneficial for the internal organs.
Gentle Daily Twist: Before you get up in the morning, draw you knees up towards your chest. Take a breath in and as you exhale let both legs relax over to the right. Inhale the knees back to the centre, exhale them over to the left. Add on: turn your head away from your knees with each twist to move the whole spine.
3 to 5 times to each side.
PRACTICE INVERSIONS–
Inversions, such as legs up the wall, help to circulate lymph fluid through the lymphatic system – this is your body’s ‘rubbish collection’ service. It rids the body of toxins and other unwanted materials and transports immune cells around the body to fight off infection, significantly contributing to the workings of immunity in the body.
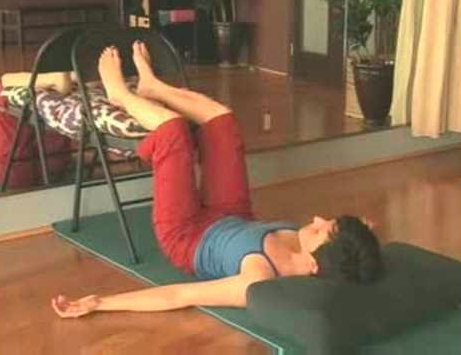
Here’s a couple of ways to practice inversions from reclining on your back :
(1) place your calf muscles on to the seat of a chair
(2) in bed place 3 or 4 pillows underneath your lower legs and ankles
(3) on the floor, sit with your right hip against the wall and as you lye back swings your legs up on to the wall.
Stay here for 5 deep breaths.
Remember when you come out of an inversions pay attention to you blood pressure, roll on to your side and stay here for a few deep breaths. If there is pounding between your ears stay here a little longer. Sit up slowly.
USE YOUR BREATH –
Look after your lungs through winter with this easy yoga practice to increase the intake of oxygen, helping to build resistance to infection. A study from 1992 (yes, 1992) assessed whether arm positions affects air intake and oxygen consumption. The researchers found that when subjects held their arms at shoulder height whilst breathing, their oxygen consumption was higher compared to when subjects held their arms by their sides. These benefits continued for two minutes after their arms were lowered. It makes you wonder why we don’t all do this!
From standing or seated: Inhale, count to 4, lift your arms up level with your shoulders, as you exhale count the breath out for 8 and lower your arms down. Repeat 3 to 5 times.
If you are from New Zealand or have spent anytime there you maybe familiar with Maori poi dance. Kate Riegle van West, a PhD student from the USA, has been studying international poi and it’s cognitive effects on the over 60’s at the University of Auckland.Kate explained that her background in circus and dance had included using poi in performances, over time she began to notice that using poi always left her feeling good. Her curiosity was sparked – what was it about poi that created positive feelings?To find out Kate decided to pack her bags and head off to New Zealand where poi is widely used, today her study has become a world’s first to systematically evaluate the potential health benefits of poi for older adults.
Tell us what exactly do you mean by poi?
“Poi is a weight on the end of a cord which you spin in circular patterns around your body. It is generally a form of dance and play. There are two distinct poi styles: Maori poi and International poi.”
Why do you think poi will have an effect on ageing?
“Our ageing population is set to increase by 2.5 times by 2050. This is a reversal of the demographics in 1950 and a phenomenon which will not be reversed in the foreseeable future. I believe poi has the potential to improve physical and cognitive functions in older adults. I would love to see poi in hospitals, retirement villages and nursing homes worldwide. Anyone can practice poi, from able bodied to those in wheelchairs or bed ridden. This research shows that poi maybe a promising tool for maintaining or improving quality of life in old age and will hopefully pave the way for future research.”
The randomised study tested 79 older adults age 60 and over, practicing poi twice a week over a one month period. At the end of the month, participants were reassessed for balance, grip strength, memory and attention – everyone had made improvements, everyone reported better coordination and said they enjoyed the challenge of learning a new skill. Kate says: “This research shows that poi may be a promising tool for maintaining or improving quality of life in old age, and will hopefully pave the way for future research on poi and health.”
Recovering from illness?‘Yoga in Bed’ to help you get moving again.
Many people believe that anyone recovering from a illness or injury should not exercise, rather wait until your energy returns. But years of teaching yoga has taught me that the smallest movements can be the most powerful for the body, helping to trigger the process of healing well. The really challenging part for most people after a period of illness is getting started, finding the motivation and maintaining it. Sometimes we get into such a slump that even the thought of making positive changes seems too much – you are not alone, we can all feel like this at times. Just remember that with some small steps, baby ones in fact, you can get started. Here’s a baby-step, wriggle your fingers and toes for a few minutes everyday. It may not sound like much but there are literally millions of nerve endings in your hands and feet, this will strengthen the mental pathways in the brain.
MAKE A PLAN:
When you are ready to consider some sort of exercise the best place to start is having a talk with your doctor. Depending on your illness there maybe specific things to work on or avoid. Know the effects of your medications, for instance are you more likely to become dehydrated?
Make a safe plan with your doctor’s help. If you make a couple of goals, write then down – you’ll be more likely to achieve them.
Prepare mentally by visualising yourself doing some sort of physical activity that you used to do for a few minutes every day, recreate the sensations of walking the dog or going for a swim for example. Research shows that the daily practice of imagery has a significant effect on recovery times.
Starting with a slow low-impact activity like yoga is ideal. ‘Yoga in Bed’ is practiced from reclining,think of it as your time to look after yourself healing and renewing. In this practice coordination of breath and movement will stimulate the body’s circulation, metabolism and elimination processes, use of the breath causes the nervous system to trigger relaxation, releasing muscle tension. Remember to pay attention to any sort of pain – it is the body’s signal that you’ve gone too far.
Rest and recovery are as important to reintroducing exercise as the physical activity itself, whether you choose to do the first 5 minutes of the yoga practice or the whole thing – giving yourself a period of relaxation afterwards it’s very important, it’s when your body starts to renew and rebuild in response to the exercise. Regular practice, be it short or long, will help to build energy and the enthusiasm to do more.
Not being able to get your lipstick straight or see that rouge eyebrow hair sticking-up is the worst thing about failing eye-sight; closely followed by searching for your glasses when they were on top of your head the whole time!
There are several steps you can take to protect your eyes, such as wearing the right sunglasses, but did you know that there are simple yoga practices to strengthen the eye muscles?
Try this practice to optimize your optical arsenal:
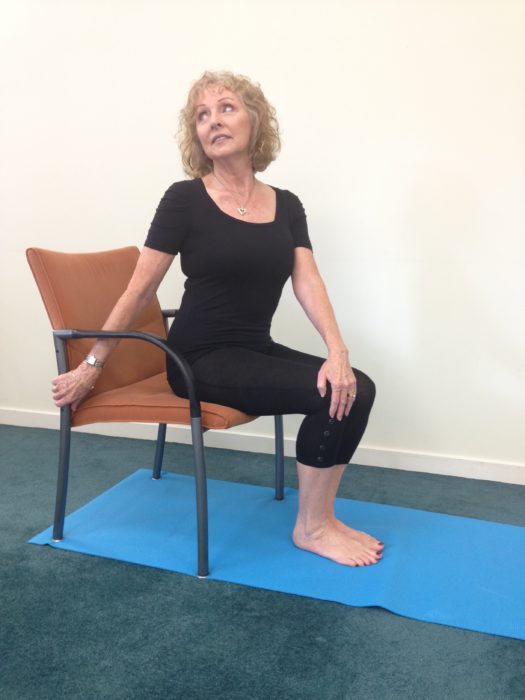
Sitting upright in a chair, image that you have a giant clock face in front of you.
Without moving your head or lifting your chin, look up to 12:00 (midnight) on the clock face, hold and take three breaths.
Now drop your eyes to the right, looking at 3pm, hold – take three breaths.
Look down to 6pm, three breaths.
Lift the gaze up the left to 9pm, three breaths.
And back to midnight. Repeat this practice, moving the eyes anti-clockwise.
Top tips:
If your eyes begin to tire, close them, rest the muscles then start again.
Practice eye yoga every day to improve your vision.